 English
 Česky
Česky
 Polski
 Latviski
 Magyarul
Creating Content
This page contains instructions for creating website content. It therefore assumes that the user is logged in and that a task has already been created. Language versions of the task can then be created according to the following procedure.
The application is designed to allow users to create version content without requiring knowledge of HTML. The content is written in a natural and clear way as plain text. To create HTML elements (such as headings, lists, tables, etc.), we use simple formatting tags, which are described below.
First, enter the title, keywords, and a comment into the appropriate fields. Don’t forget to separate individual keywords with a semicolon. The main content, including formatting tags, is written in the Content field. Once the content is complete, click the button. The entire content will then be saved and converted into HTML code.
Tip: If you are creating a new version, load the content of the English version into the editing fields. To do this, simply click the "Load data from English version" option in the top left corner. You can then replace its section by section with your translation directly in the editor. Additionally, you will already have the tables, lists, and images inserted in your text.
Now let’s take a look at the rules for creating content.
Paragraphs
A paragraph is formed by one or more consecutive lines of text. To start a new paragraph, it must be separated from the previous text by a blank line.
Tip: You can insert any number of blank lines into the editing field to make your text more organized. Any extra blank lines will be ignored during processing.
Formatting tags
Formatting tags are used to create headings, format text, build lists and tables, insert images, and add other elements. They can be written manually or inserted using the toolbar in the blue area:

Now let’s take a look at the individual tags.
Headings
Three levels of headings are available: large, medium, and small. All headings are created by underlining the text:
- large with hashes #
- medium with asterisks *
- small with equals signs =
To make this easier, you can use the button on the toolbar:
- select the text in the editing field
- click the button and choose the heading level.
The selected text will be automatically underlined accordingly.
Tip: Do not insert the version title as the first heading, as it will be added to the page automatically.
Text Formatting
To italicize text, surround it with single asterisks:
To make text bold, use double asterisks:
To make subscript and superscript, use standard HTML tags:
You can also use the button:
- select the text in the editing field
- click the button and choose the desired format.
Links
You can assign a hyperlink to a selected piece of text, making it clickable.
Select the text in the editor, click button, and choose the option. The Link generator will open, where you can enter the URL of the web page. By checking the option Open link in a new tab, the link will open in a new browser tab.
For example, if the selected text is "click here" and the URL is https://www.google.com, the resulting link will have the following form:
If the Open link in a new tab option is selected, the format will be:
You can also create and edit links directly in the editor (without using the Link generator), but the result must follow the format shown above, including the parts .[version-text-link] and, if applicable, {target:_blank}.
Tip: You do not need to specify the protocol https://; the Link generator will add it automatically.
Lists
To create an unordered list, begin each line with a hyphen followed by a space:
To create an ordered list, use numbers followed by a parenthesis:
To simplify the process, select the lines with the list items, click the button, and choose the list type.
Images
To work with images, you need to use the button.
To insert an image, you must:
- upload it using the button,
- insert it using the button.
During insertion, you can set the image alignment, maximum width in pixels, and a caption. All of these settings are optional — if you omit them, the image will be inserted aligned to the center, at its original width, and without a caption.
The image tag will be inserted at the current cursor position and will look approximately as follows:
Important parts of the tag are:
- .[left-aligned] specifies the alignment, other possible values are .[right-aligned] and .[center-aligned],
- {max-width: 600px}specifies the maximum width,
- A school of fish is the image caption.
If you want to change the image, you can delete the entire tag and insert it again.
If you want to change the alignment, the width or the caption, you can simply edit the relevant parts of the tag. Just be careful not to delete any other part of the tag, such as the px unit after the width value, the three asterisks *** separating the caption or the dot . before the alignment. There must be no space between the alignment and width declarations.
Tip: All language versions of a given task share the same set of images. Therefore, if you are creating a new version of an existing task, the images used in other versions are available in the dialog and don’t need to be uploaded.
Wrapping Text Around Images
If an image is aligned to the left or right, the following content will automatically wrap around it. In some cases, you may need to stop the wrapping, especially if it affects elements that should appear on a separate line — such as headings, tables, or other block elements.
To do this, insert the following tag before the element that should start on a new line:
Tables
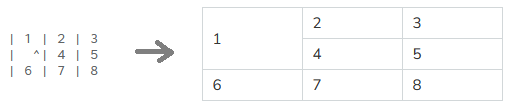
To create a table, separate the columns using the vertical bar | character:
It is not necessary place a | character after the last column.
To create a table with a header, use the following format:
For easier table creation, use the Table Designer available under the button. The process is simple:
- Define the dimensions of the table and create it.
- Fill in the cell contents and insert the table into the text.
The table will be inserted at the current cursor position in the editing field.
Merging cells
To merge columns (horizontally), use a double vertical bar ||. That means leaving the cell empty and writing only the separating bars. The empty cell will be merged with the cell to its left:
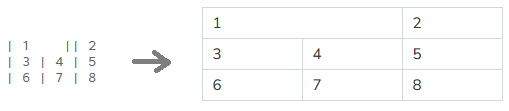
To merge rows (vertically), use the caret symbol ^ placed before the right vertical bar. The cell will be merged with the cell above it:
Cell content alignment
By default, cells are aligned to the left horizontally. To change this, add one of the following markers to the end of the cell content:
- .[cell-h-center] for horizontal center alignment
- .[cell-h-right] for horizontal right alignment

Vertically, cells are aligned to the center by default. To change this, add:
- .[cell-v-top] for vertical top alignment
- .[cell-v-bottom] for vertical bottom alignment
You can combine horizontal and vertical alignment like this:
- .[cell-h-center cell-v-center]

Images in Tables
In order to insert an image into a table cell:
- create a table either using the Table Designer or directly in the editing field,
- place the cursor in the cell where you want to insert the image, then click → ,
- fill in the image parameters, check the option I’m placing an image into a table , and select your image.
If you, for example, set the maximum width to 300 and enter the caption "comment", a tag like this will be inserted into the table cell:
You can edit the caption and width directly in the editing field. Just make sure to keep the x? part after the width — it tells the system to automatically calculate the image height.
Tip: The image alignment option (center, left, right) has no effect when placing an image inside a table. The image will be aligned based on the cell’s content alignment.
Blocks
The following options are used to format entire selected blocks of text. They are useful when you want to clearly distinguish specific types of content.
Source code
If you need to include source code (e.g. from a computer program), use the following structure:
- Start the block with the tag /---code
- End the block with the tag \---
This will display your code in a clearly separated area with a blue background, using a monospace font and without line wrapping.
You can use the toolbar to make the block - select the block content in the editing field, click the button, and choose the option.
Solution
Use the solution block for content that includes answers or full solutions to the task. These blocks are hidden in the working version of the task, so they will not be visible to students by default. In the full version the blocks are visible, clearly separated by a green background. You can include any type of content inside – text, lists, tables, even images.
To define a solution block, use the following structure:
This allows you to separate the solution from the task itself and control its visibility.
To make this simpler, you can select the block content in the editing field, click the button, and choose the option.
Answer sheet
Place elements (tables, lists, images, etc.) in the Answer sheet block that are meant to be filled in or completed by the student. The block:
- starts with the tag /---div .[answer-sheet]
- ends with the tag \---.
The block is visually separated from surrounding content by a beige background. You can create the block manually or use the toolbar: select the block content in the editing field, click the button and select the option.
Gap
A Gap is used to insert an empty space where students can write their answers. You can insert it using the following tag:
This will create a space approximately four lines high. If you want a larger gap, simply insert multiple Gaps in a row:
You can add a gap manually, or use the button and select the option. The Gap tag will be inserted at the current cursor position in the editing field.